Transform ordinary cupcakes into show-stopping conversation starters with these incredibly realistic melted candle cupcakes that will leave your guests amazed!
Imagine the look of wonder on your guests’ faces when they see what appears to be actual melted candles sitting on your dessert table—only to discover they’re delicious, edible cupcakes! These stunning melted candle cupcakes are the perfect blend of artistry and flavor, creating an unforgettable centerpiece for birthdays, Halloween parties, dinner gatherings, or any celebration where you want to surprise and delight.
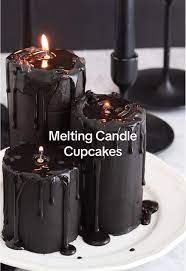
The magic lies in the realistic “melted wax” effect created with white chocolate ganache and carefully placed pretzel stick “wicks.” These aren’t just treats—they’re edible art pieces that showcase your creativity while delivering incredible taste. Best of all, they’re surprisingly achievable for bakers of all skill levels.
What Makes Melted Candle Cupcakes So Special?
These cupcakes combine visual impact with delicious flavors, making them perfect for:
- Birthday parties where you want an alternative to traditional candles
- Halloween gatherings for a spooky-elegant touch
- Dinner parties as a sophisticated dessert surprise
- Social media moments that will earn countless likes and shares
- Baking challenges when you want to try something uniquely creative
The realistic dripping effect is achieved through a simple but clever technique using white chocolate ganache that naturally flows down the sides, creating authentic-looking melted wax pools and drips.
Essential Ingredients You’ll Need
For the Cupcakes:
- 1¾ cups all-purpose flour
- 1 cup granulated sugar
- ¼ cup cocoa powder (for chocolate base)
- 1 teaspoon baking soda
- ½ teaspoon salt
- 1 cup warm water
- ⅓ cup vegetable oil
- 1 tablespoon white vinegar
- 1 teaspoon vanilla extract
For the “Melted Wax” Ganache:
- 12 oz white chocolate chips or chopped white chocolate
- 1 cup heavy cream
- Food coloring (optional, for tinted candles)
- 1-2 tablespoons corn syrup (for extra shine)
For Assembly and Decoration:
- 12-15 pretzel sticks (for wicks)
- Black food coloring or cocoa powder
- Small paintbrush
- Parchment paper
- Cooling racks
Step-by-Step Instructions for Perfect Melted Candle Cupcakes
Phase 1: Creating the Cupcake Base (45 minutes)
Step 1: Prepare Your Kitchen Preheat your oven to 350°F (175°C) and line a 12-cup muffin tin with paper liners. Choose neutral colors like white, cream, or light brown to enhance the illusion of the candle.
Step 2: Mix the Dry Ingredients In a large mixing bowl, whisk together flour, sugar, cocoa powder, baking soda, and salt. The cocoa powder gives these cupcakes a rich, dark base that resembles the bottom of melted candles.
Step 3: Combine Wet Ingredients In a separate bowl, mix warm water, vegetable oil, vinegar, and vanilla extract. The vinegar may seem unusual, but it reacts with the baking soda to create incredibly moist and tender cupcakes.
Step 4: Create the Batter. Pour the wet ingredients into the dry ingredients and stir until just combined. Don’t overmix—a few lumps are perfectly fine and will result in more tender cupcakes.
Step 5: Bake to Perfection Divide batter evenly among cupcake liners, filling each about ⅔ full. Bake for 18-22 minutes, or until a toothpick inserted in the center comes out clean. Cool completely on wire racks—this is crucial for the ganache application.
Phase 2: Crafting the Melted Wax Effect (30 minutes)
Step 6: Prepare the White Chocolate Ganache Heat heavy cream in a saucepan until it just begins to simmer (don’t let it boil). Remove from heat and pour over white chocolate chips in a large bowl. Let sit for 2 minutes, then stir from the center outward until smooth and glossy.
Step 7: Add the Magic Touch Stir in corn syrup for extra shine and a realistic wax-like appearance. If making colored candles, add a few drops of food coloring now. Pastel colors work beautifully—think soft pink, lavender, or pale yellow.
Step 8: Perfect the Consistency Let ganache cool for 10-15 minutes until it’s thick enough to coat the back of a spoon but still flows easily. This is the perfect consistency for creating realistic drips.
Phase 3: Assembly and Decoration Magic (20 minutes)
Step 9: Create the Wick Effect. Using a small paintbrush, lightly brush the top inch of each pretzel stick with black food coloring or dust with cocoa powder. This creates the illusion of a burnt wick. Let dry completely.
Step 10: Apply the Ganache. Place cooled cupcakes on a wire rack set over parchment paper (to catch drips). Starting from the center, pour ganache over each cupcake, letting it naturally flow over the edges and down the sides. The key is to work confidently—hesitation creates uneven drips.
Step 11: Insert the Wicks. While ganache is still soft, carefully insert a prepared pretzel stick into the center of each cupcake, pushing down about halfway. The ganache will set around it, holding it in place.
Step 12: Perfect the Drip Effect. Use a small spoon to add extra ganache drips where needed, creating realistic melted wax pools at the base. Work quickly before the ganache begins to set.
Creative Decoration Ideas to Elevate Your Cupcakes
Color Variations for Different Occasions
Classic Elegance: Pure white ganache creates sophisticated, formal-looking candles perfect for dinner parties or adult celebrations.
Birthday Brights: Add pastel food coloring to create a rainbow of birthday candles. Try soft pink, baby blue, mint green, and pale yellow for a whimsical effect.
Halloween Drama: Mix orange and black ganache for spooky Halloween candles, or create deep purple and burgundy for a gothic aesthetic.
Holiday Cheer: Red and green ganache makes these perfect for Christmas gatherings, while gold-tinted ganache adds luxury to New Year’s parties.
Advanced Decoration Techniques
Layered Wax Effect: Apply ganache in two stages—first a base coat in one color, then drips in a slightly different shade to mimic real layered candle wax.
Textured Surface: Before ganache fully sets, use a fork to create subtle texture lines that mimic the natural ridges found in real candles.
Wax Seal Effect: Press small fondant circles into the soft ganache near the base to create the appearance of candle maker’s seals.
Aged Candle Look: Dust finished cupcakes lightly with cocoa powder or cinnamon for a vintage, used-candle appearance.
Pro Tips for Bakery-Quality Results
Temperature Control is Everything
The success of these cupcakes largely depends on temperature management. Ganache that’s too hot will slide right off, while ganache that’s too cool won’t create smooth drips. Test on one cupcake first to perfect your technique.
Timing Your Assembly
Make cupcakes up to two days ahead and store covered at room temperature. Prepare the ganache the day of serving for the best consistency and appearance.
Creating Uniform Drips
For consistent results, use a ladle or large spoon rather than pouring directly from the bowl. This gives you better control over the ganache flow.
Wick Positioning
Insert wicks at a slight angle rather than perfectly straight—this creates a more natural, realistic candle appearance.
Party Planning with Melted Candle Cupcakes
Presentation Ideas That Wow
Candelabra Display: Arrange cupcakes on tiered serving stands of varying heights to create the illusion of an elaborate candelabra.
Dining Table Centerpiece: Place cupcakes down the center of your dining table, interspersed with real (unlit) candles for a stunning mixed display.
Individual Place Settings: Present one cupcake at each place setting as both decoration and dessert.
Dessert Station Surprise: Create a dedicated dessert station where guests can “discover” that the realistic candles are actually edible treats.
Portion Planning and Serving
Plan for 1-2 cupcakes per guest, depending on the size of your meal and other desserts being served. These rich, decadent treats are quite satisfying, so guests typically won’t need large portions.
Consider providing small dessert plates and forks, as the ganache coating makes these slightly messier to eat than regular cupcakes—but the wow factor is absolutely worth it.
Storage and Make-Ahead Strategies
Short-Term Storage (1-3 Days)
Store completed melted candle cupcakes in a single layer in airtight containers at room temperature. The ganache will maintain its appearance, and the cupcakes will stay moist for up to three days.
Avoid refrigeration if possible, as cold temperatures can cause the ganache to lose its glossy appearance and develop condensation when brought back to room temperature.
Make-Ahead Components
Cupcakes: Bake cupcakes up to three days ahead and store tightly wrapped at room temperature, or freeze for up to one month.
Ganache: Prepare ganache up to one week ahead and store refrigerated. Gently reheat in 15-second microwave intervals, stirring between each interval, until it reaches the proper consistency for dripping.
Pretzel Wicks: Prepare decorated pretzel sticks up to one week ahead and store in an airtight container.
Freezing and Long-Term Storage
While these cupcakes are best served fresh, you can freeze the decorated cupcakes for special occasions. Place finished cupcakes on a baking sheet and freeze until solid, then transfer to freezer bags. Thaw at room temperature for 2-3 hours before serving.
Troubleshooting Common Issues
Ganache Problems and Solutions
Ganache Too Thin: If your ganache won’t stick or drip properly, it’s likely too warm. Let it cool for 5-10 minutes longer and test again.
Ganache Too Thick: If ganache won’t flow smoothly, gently warm it in 10-second microwave intervals until it reaches the right consistency.
Lumpy Ganache: This usually means the cream was too hot or the mixture wasn’t stirred properly. Strain through a fine-mesh sieve and reheat gently if needed.
Assembly Challenges
Wicks Won’t Stay Upright: Insert wicks when ganache is at the perfect consistency—soft enough to penetrate easily but thick enough to hold the stick in place.
Uneven Drips: Work quickly and confidently when applying ganache. Practice your technique on a few test cupcakes if needed.
Color Bleeding: If using multiple colors, let each layer set for 10-15 minutes before adding the next to prevent colors from mixing.
Nutritional Considerations and Dietary Adaptations
Making It Your Own
These cupcakes can easily be adapted for different dietary needs. Use gluten-free flour blend for celiac guests, or substitute dairy-free chocolate and coconut cream for the ganache to accommodate dairy sensitivities.
For lower sugar options, reduce the granulated sugar in the cupcake base by ¼ cup—the rich ganache provides plenty of sweetness.
Nutritional Information
Each melted candle cupcake contains approximately 380 calories, making them a rich, indulgent treat perfect for special occasions. The combination of chocolate cake and white chocolate ganache provides a satisfying dessert that guests will remember long after the party ends.
Final Thoughts: Creating Memorable Moments
Melted candle cupcakes represent more than just dessert—they’re conversation starters, Instagram moments, and delightful surprises that transform ordinary gatherings into extraordinary memories. The joy on guests’ faces when they realize these realistic candles are actually delicious treats makes every minute of preparation worthwhile.
Whether you’re planning an intimate dinner party or a large celebration, these show-stopping cupcakes provide the perfect blend of visual drama and incredible taste. The technique might seem complex, but with patience and practice, even beginning bakers can create professional-looking results that will have everyone asking for the recipe.
Remember, the beauty of these cupcakes lies not just in their realistic appearance, but in the creativity and care you put into making them. Each drip of ganache, each carefully placed wick, and each color choice reflects your personal touch and attention to detail.
So gather your ingredients, embrace the creative process, and prepare to amaze your guests with these truly unique melted candle cupcakes. Your next party just became infinitely more memorable!